What’s up, hackers! 👋

I’m back with a write-up series for CAT CTF 2026. This competition was a legendary experience for me. Despite playing SOLO against some heavy-hitting teams, I managed to fight my way up and secure 4th Place overall! 🏆
It was a test of endurance, speed, and precision. Playing solo means you are the lead investigator, the web expert, and the forensic analyst all at once. The grind was real, but the result feels even better.
🚀 Performance Highlights:
- The OSINT Gauntlet: I cleared 4 out of 5 OSINT challenges. I was on a roll, but the clock was my only enemy—I simply ran out of time before I could wrap up the final one.
- First Blood 🩸: I managed to snag the First Solve on 2 of those OSINT challenges.

I want to give a massive shout-out to all the authors for these creative and high-quality challenges. They kept me on the edge of my seat from start to finish.
Enough with the talk—it’s time to get technical. We’re going to dive deep into my favorite playground. Let’s start the series with the OSINT walkthroughs!
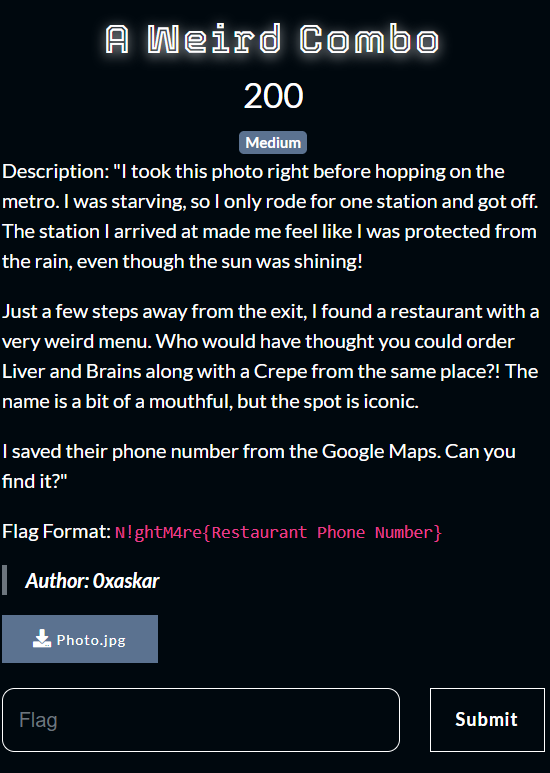
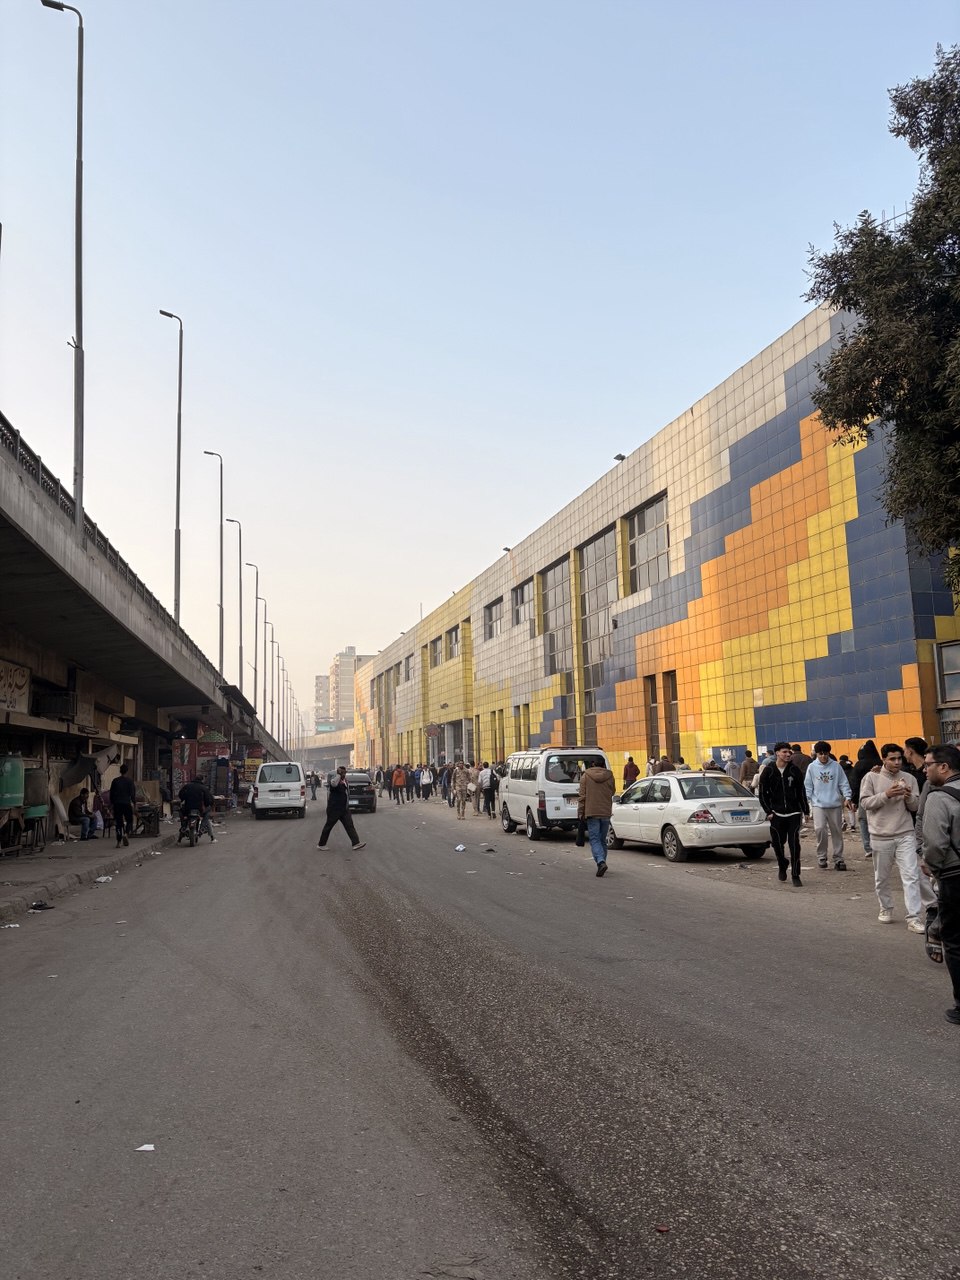
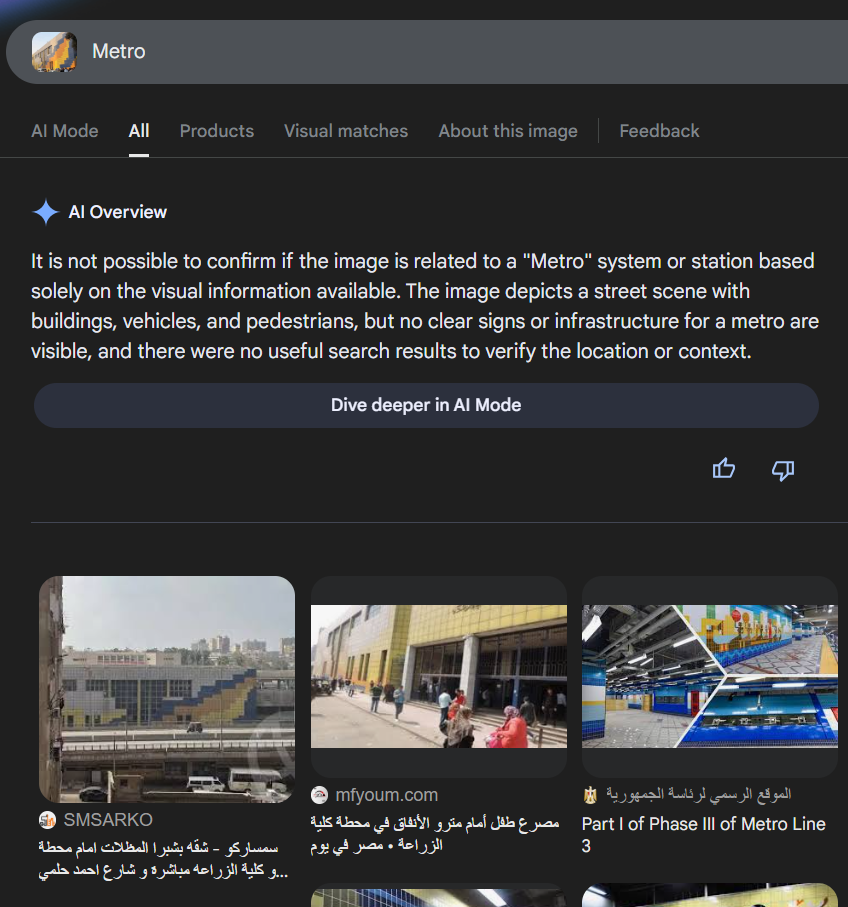
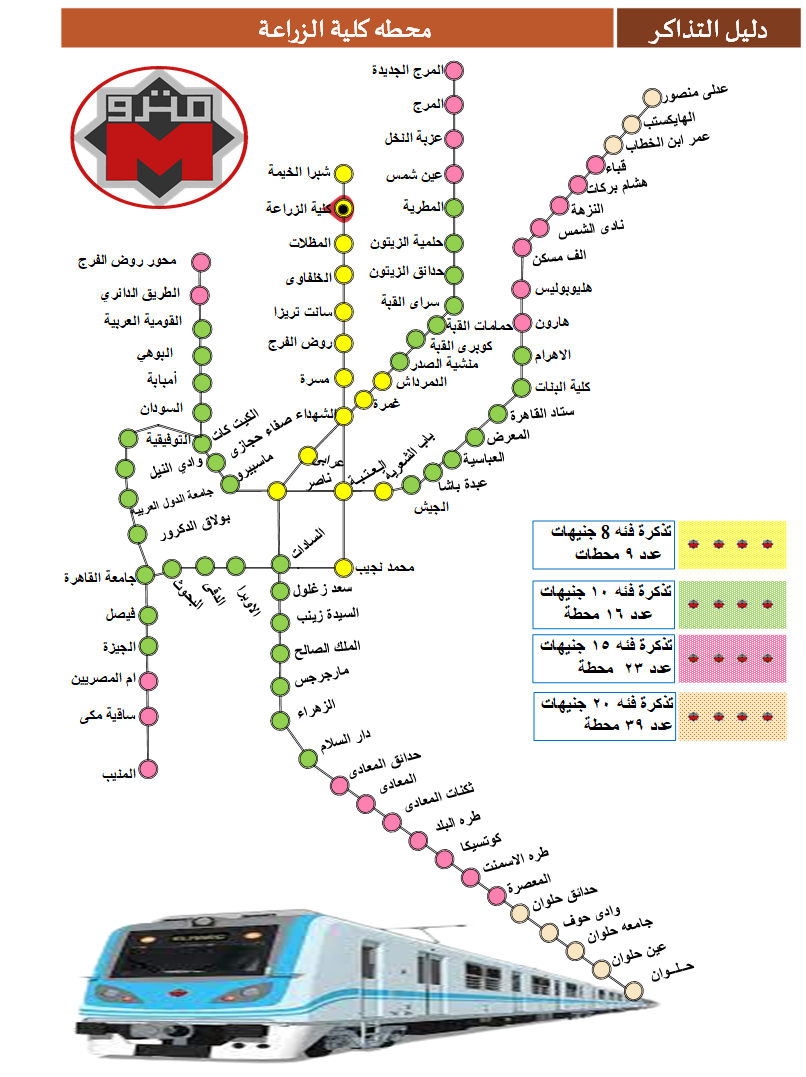
🕵️♂️ OSINT Series: Who Will Win the Million?
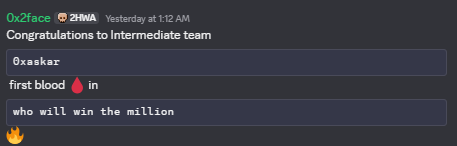
Today I’m sharing a special write-up for a OSINT challenge that was easy. I managed to snag the First Blood (First Solve) 🩸.
It was a trivia-style survival game where you had to answer 12 OSINT questions in a row. One typo, one wrong date, or one wrong format, and the connection drops. It’s all about precision and fast “Google Dorking” skills.
Below is the full walkthrough of how I hunted down the answers and secured the flag.
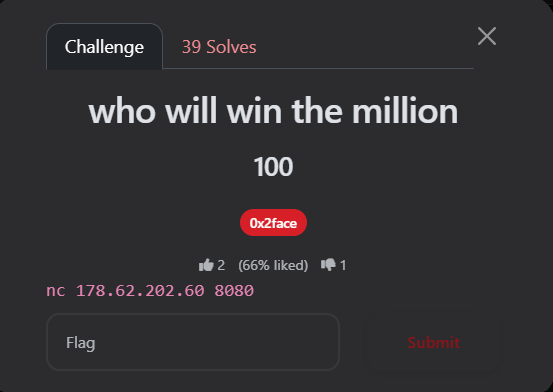
Author: 0x2face
Points: 100
📝 The Challenge Description
nc 178.62.202.60 8080
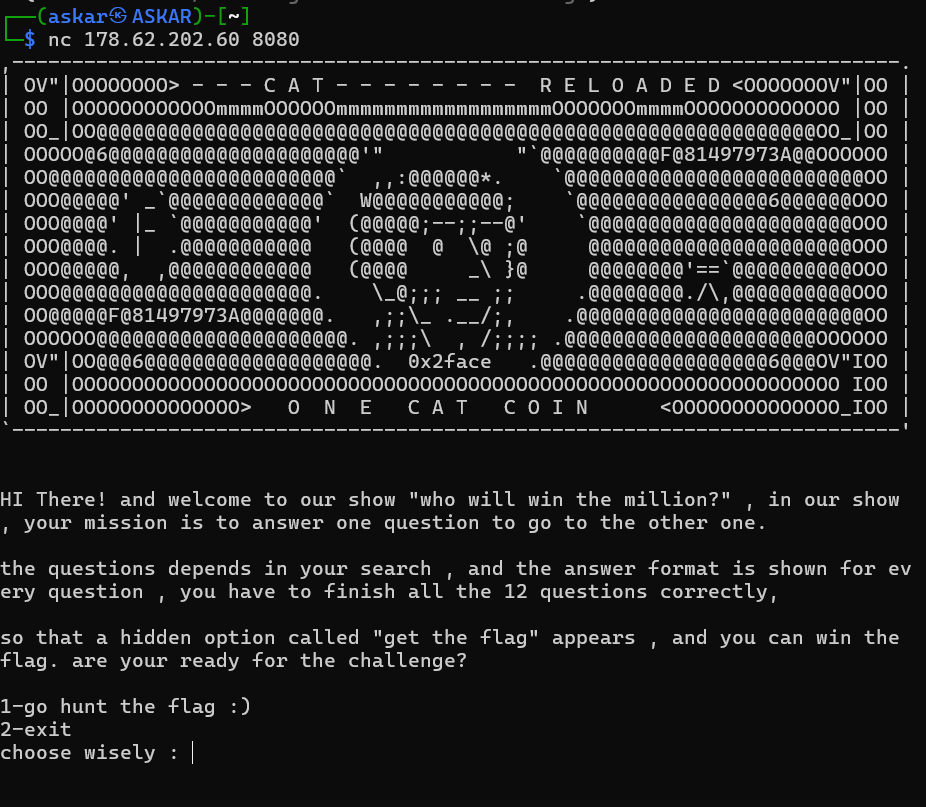
🔍 Phase 1: The Connection
Connecting to the server gives us a cool ASCII art intro. I chose option 1 to start the hunt.
🚇 Phase 2: The 12 Questions Walkthrough
1. Microsoft Hafnium Attack
-
Question: What is the date Microsoft disclosed the exchange server hafnium attack?
-
Format:
DD-MM-YYYY -
Search: “Microsoft exchange server hafnium disclosure date”
-
Answer:
02-03-2021 -
Reference: Talos Intelligence

2. Yahoo Data Breach
-
Question: What is the date of the data breach of the 500m accounts of yahoo?
-
Format:
DD-MM-YYYY -
Search: “Yahoo 500 million accounts breach date”
-
Answer:
22-09-2016 -
Reference: Wikipedia

3. The Silk Road
-
Question: What is the real name of the founder of the silk road dark web marketplace?
-
Format:
Fname_Lname -
Search: “Silk Road marketplace founder”
-
Answer:
Ross_Ulbricht -
Reference: Wikipedia

4. LulzSec Leader “Sabu”
-
Question: What is the real name of the hacker known as “Sabu” who was a leader of lulzsec?
-
Format:
Fname_Lname -
Search: “Sabu hacker real name”
-
Answer:
Hector_Monsegur -
Reference: Wikipedia

5. Breach Forums Takedown
-
Question: What is the real name of the person arrested in 2023 who was associated with owning and operating breach forums?
-
Format:
Fname_Lname -
Search: “Breach Forums owner arrest 2023”
-
Answer:
Conor_Fitzpatrick -
Reference: Department of Justice

6. The Condor
-
Question: What is the real name of the individual known as “the condor” in early phone phreaking history?
-
Format:
Fname_Lname -
Search: “The Condor hacker real name”
-
Answer:
Kevin_Mitnick -
Reference: LA Times

7. WikiLeaks Founder
-
Question: What is the name of the founder of wikileaks?
-
Format:
Fname_Lname -
Search: “Founder of WikiLeaks”
-
Answer:
Julian_Assange -
Reference: Wikipedia

8. Facebook Access Tokens
-
Question: What is the date facebook announced the breach exposing 50m access tokens?
-
Format:
DD-MM-YYYY -
Search: “Facebook 50m access tokens breach announcement date”
-
Answer:
28-09-2018 -
Reference: BBC News

9. The Morris Worm
-
Question: What is the name of the hacker who created the morris worm in 1988?
-
Format:
Fname_Lname -
Search: “Creator of Morris Worm 1988”
-
Answer:
Robert_Morris -
Reference: Okta Identity 101

10. Onion Routing Protocol
-
Question: What is the name of the founder of the onion routing protocol?
-
Format:
Fname_Lname -
Search: “Inventor of onion routing”
-
Answer:
Paul_Syverson -
Reference: Wikipedia

11. eBay Data Breach
-
Question: What is the date ebay disclosed its 145m user data breach?
-
Format:
DD-MM-YYYY -
Search: “eBay 145m data breach date”
-
Answer:
21-05-2014 -
Reference: Washington Post

12. LinkedIn Credential Breach
-
Question: What is the date linkedin confirmed the massive credential breach?
-
Format:
DD-MM-YYYY -
Search: “LinkedIn 2016 breach confirmation date”
-
Answer:
18-05-2016 -
Reference: LinkedIn Help Center

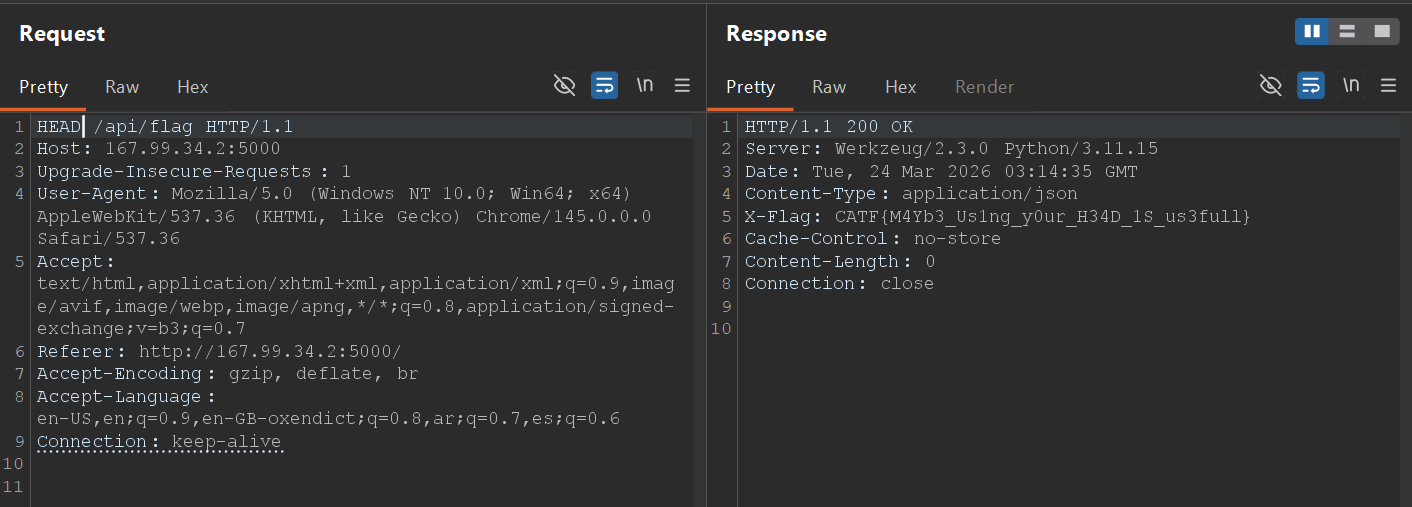
🏁 Phase 3: Extraction
After getting through the gauntlet of questions, the “Millionaire” prompt finally changed! I was given the option to finally claim the prize.
“Congrats! You finished our OSINT questions and deserve the flag :)”
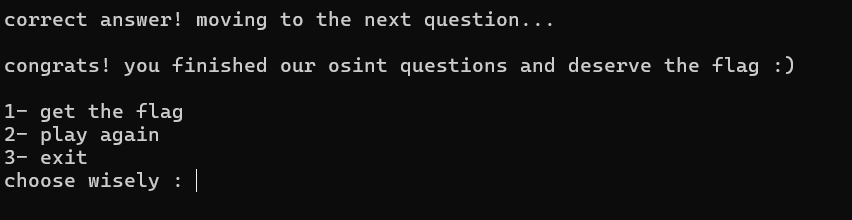
I selected 1- get the flag and got the final payload.
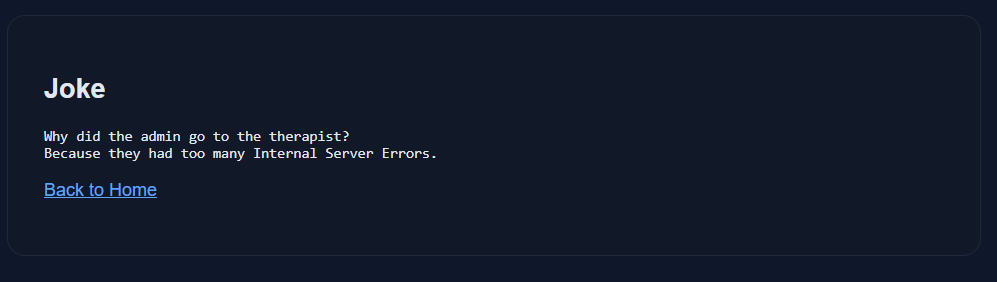
Flag: CATF{0S1NT_1S_C00L_1F_U_KN0W_H0W_T0_USE_Y0UR_SE3RCH_SK11LS_W3LL}

==============================================
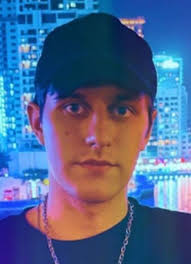
🕵️♂️ OSINT Series: Murder
This was the second OSINT challenge I tackled in CAT CTF 2026. This one wasn’t just about quick searching; it was about Criminal Profiling and connecting the dots of a real-life dark story. I had to dive deep into a famous criminal case to extract the fragments needed for the flag.
Author: 0x2face
Points: 100
📝 The Challenge Description
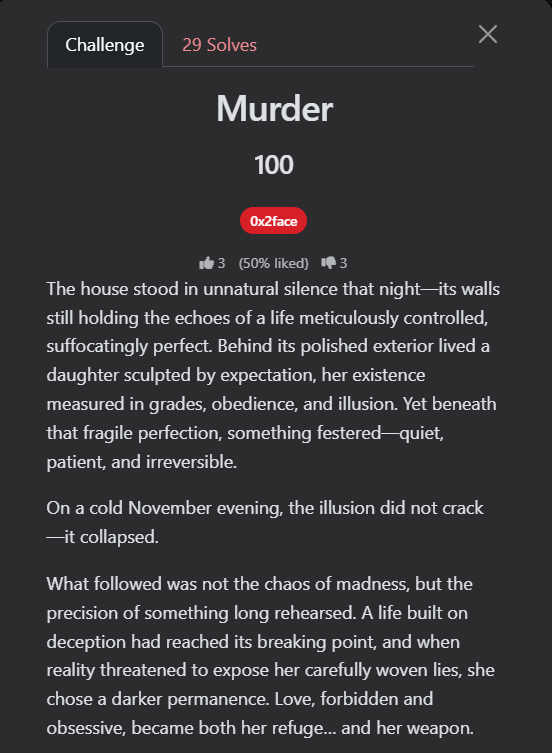
The house stood in unnatural silence that night—its walls still holding the echoes of a life meticulously controlled, suffocatingly perfect. Behind its polished exterior lived a daughter sculpted by expectation, her existence measured in grades, obedience, and illusion. Yet beneath that fragile perfection, something festered—quiet, patient, and irreversible.
On a cold November evening, the illusion did not crack—it collapsed.
What followed was not the chaos of madness, but the precision of something long rehearsed. A life built on deception had reached its breaking point, and when reality threatened to expose her carefully woven lies, she chose a darker permanence. Love, forbidden and obsessive, became both her refuge… and her weapon.
Somewhere in the shadows, a lover—equally entangled in her web—became the first thread you must follow. Find his name, the one she risked everything for, the one who stood behind the curtain of her fabricated life. That is your first fragment. (Fname_Lname)
But devotion alone could not stain the night with blood. A signal was exchanged—calculated, deliberate. A message reading “VIP Access” was sent not as courtesy, but as confirmation that the front door would be opened from within. Moments later, a call pierced the silence at precisely the right time, drawing her downstairs to fulfill her role. Trace the man who crossed the threshold—the one who answered that signal and stepped inside when the door unlocked. That identity is your second fragment. (Fname_Lname)
Between desire and execution, however, stood a broker of shadows—a man who hid behind the alias “Homeboy.” But shadows always belong to something real. Beneath that street-born name lies a true identity—one tied directly to the orchestration of what followed. Unmask him. Find the name he was born with, not the one whispered in the dark, and you will claim the third fragment. (Fname_Lname)
And finally… the lie that helped sustain her illusion long before the night of blood. She spoke of compassion, of purpose—of days spent aiding the vulnerable, walking the halls of a place devoted to healing. But like everything else, this too was a fabrication. Trace this false story to its source, uncover the name of the institution she claimed to serve, and you will obtain the final fragment. (xxx_xxxxxxx_xxx_xxxx_xxxxxxxx)
Piece them together, and the truth—long buried beneath obedience, deception, and blood—will emerge from the silence.
Flag format: CATF{Fname_Lname_Fname_Lname_Fname_Lname_xxx_xxxxxxxx_xxx_xxxx_xxxxxxxx}
The description was a long, cinematic narrative about a daughter living a “fabricated life,” a “cold November evening,” and a “broken illusion.” It mentioned:
-
A daughter pressured by high expectations.
-
A forbidden lover.
-
A signal message: “VIP Access”.
-
An accomplice alias: “Homeboy”.
-
A fake story about volunteering at a specific hospital.
🔍 Step 1: Identifying the Case (The Core)
The narrative was very specific. I started by searching for the most unique keywords from the description to find the story.
Search Query: "VIP Access" message "Homeboy" "November" daughter murder
The Discovery:
The search results led me to this link:
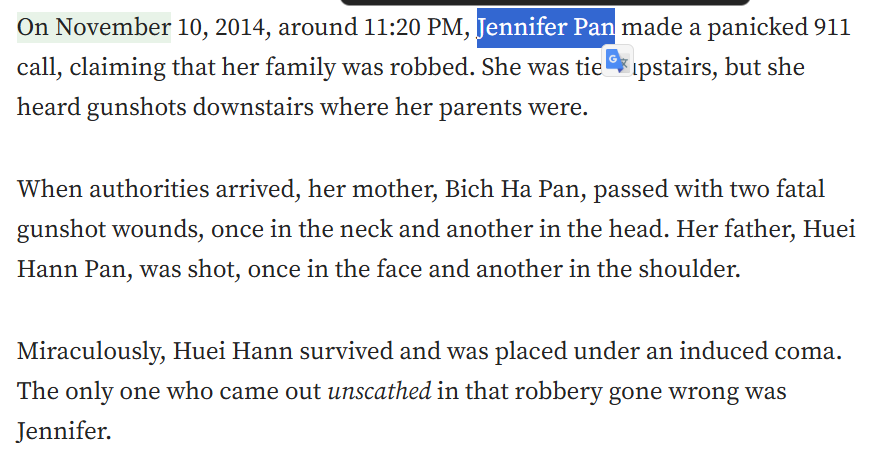
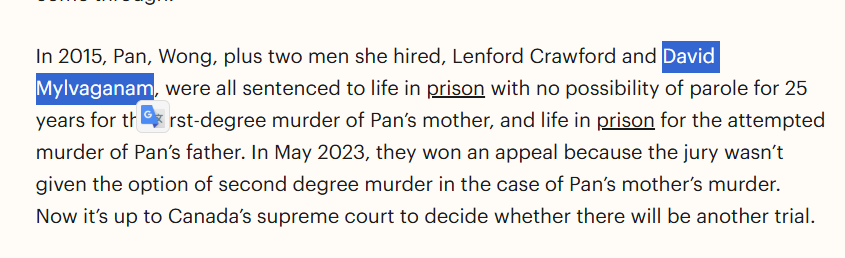
This confirmed that the story is about Jennifer Pan, a Canadian woman who orchestrated a hit on her parents in 2010.
🧩 Step 2: Extracting the Fragments
Now that the target was identified, I had to hunt for the 4 fragments.
Fragment 1: The Forbidden Lover
The challenge asked for the lover she risked everything for.
Search Query: Jennifer Pan boyfriend name
I found this article:
- Reference: Jennifer Pan’s ex-boyfriend Daniel Wong
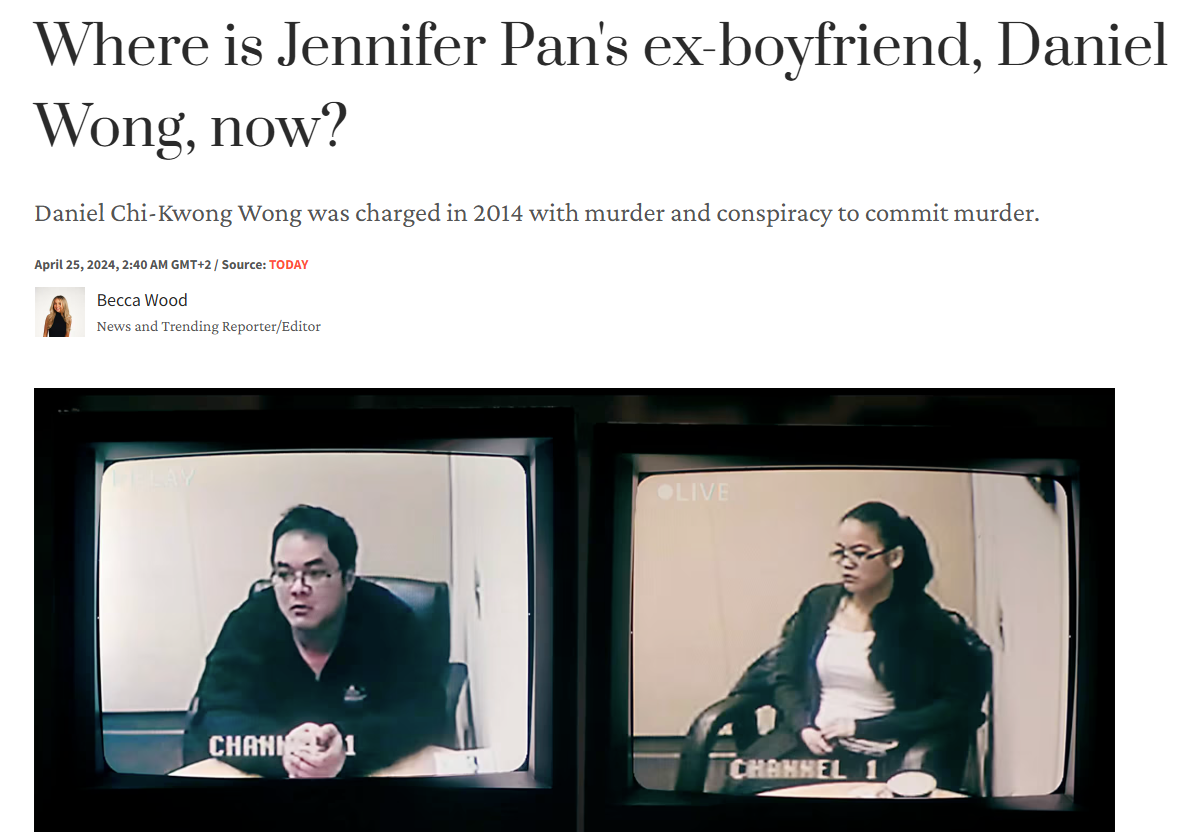
Fragment 1:
Daniel_Wong
Fragment 2: The Man who Crossed the Threshold
The description mentioned a “VIP Access” signal and a man who entered when the door unlocked.
Search Query: Jennifer Pan "VIP Access" message hitman name
This led me to a TIME article:
- Reference: What to know about Jennifer Pan
The article mentioned her co-conspirators: Lenford Crawford and David Mylvaganam. Specifically, David was the one associated with the execution of the plan on the ground.
Fragment 2:
David_Mylvaganam
Fragment 3: Unmasking “Homeboy”
I needed the real name behind the street alias “Homeboy.”
Search Query: Jennifer Pan accomplice alias Homeboy real name
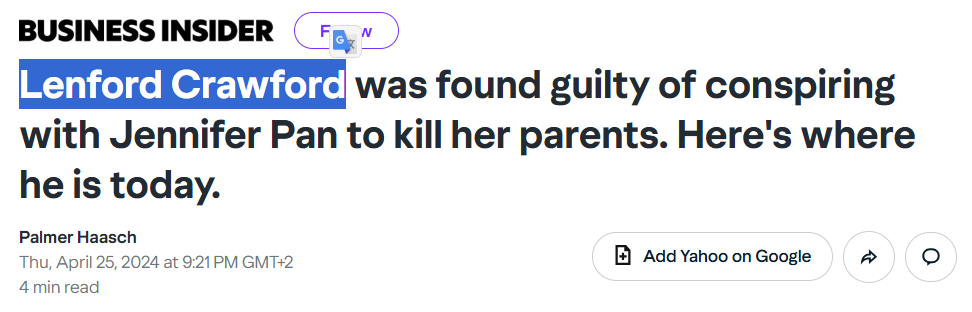
I found this Yahoo Entertainment link:
- Reference: Lenford Crawford found guilty of conspiring
The article confirms that Lenford Crawford is indeed “Homeboy.”
Fragment 3:
Lenford_Crawford
Fragment 4: The Fake Institution
The last part was the name of the hospital she claimed to volunteer at to keep her lie alive.
Search Query: Jennifer Pan fake volunteer hospital
This CBC News article gave me the exact name:

Fragment 4:
the_hospital_for_sick_children
🏁 Phase 3: Final Flag Construction
Piece them all together in order: CATF{F1_F2_F3_F4}
Final Flag: CATF{Daniel_Wong_David_Mylvaganam_Lenford_Crawford_the_hospital_for_sick_children}
==============================================
🕵️♂️ OSINT Series: Murder 2
This was the sequel to the “Murder” challenge, and it was even darker. It tells the story of a man who lived a total lie for 18 years, pretending to be a successful doctor at the WHO while he was actually doing nothing. When his lie was about to be exposed, he chose a path of blood.
Author: 0x2face
Points: 100
📝 The Challenge Description
The man did not live a double life—he lived no life at all.
For nearly two decades, he moved through the world as someone he was not, wrapped in credentials never earned and a career that existed only in conversation. Each morning, he left home with purpose, only to disappear into hours that belonged to no institution, no colleagues, no reality. To those around him, he was accomplished, respected—untouchable. But beneath that carefully sustained illusion was nothing but silence… and time running out.
Somewhere near the border between nations, a woman became part of that illusion. She believed in his status, his influence, his promises of opportunity. What began as trust slowly transformed into exploitation, as a large sum of money was handed over under the guise of investment—money that was never returned. The town where she lived, where deception took a more personal form, is where your investigation begins. That location is your first fragment. (xxxxxx-xxxxxxxx)
But long before everything collapsed, there was a moment—quiet, almost forgettable—where something didn’t quite align. A fall. A witness. A voice that tried to speak before it was silenced. Officially, it was ruled an accident. Unofficially… it left questions unanswered. You are looking for the exact date on which this incident occurred. That is your second fragment. (DD-MM-YYYY)
Years later, the illusion reached its breaking point.
What followed was not sudden madness, but something far more controlled. A sequence of actions carried out with disturbing calm—routine masking intent. By morning, everything had changed. Those closest to him, the ones who unknowingly stood closest to the truth, became part of its erasure. Identify the date on which his children were killed. That moment forms your third fragment. (DD-MM-YYYY)
In the end, the truth surfaced—as it always does.
A trial dismantled the persona piece by piece, exposing not just the crimes, but the years of fabrication behind them. He was sentenced, imprisoned, and removed from the life he had pretended to live. Yet even within confinement, time continued forward. Eventually, a threshold was reached—the moment he first became eligible to walk free again. That year is your final fragment. (YYYY)
Piece them together, and the illusion—once so carefully constructed—will collapse into clarity.
flag format : CATF{Xxxxxx-Xxxxxxxx_DD-MM-YYYY_DD-MM-YYYY_YYYY}
The description was a chilling summary of a man who “lived no life at all”:
-
Pretended to have a career for 20 years.
-
A woman near the border was scammed for a large sum of money.
-
A “fall” of a witness that was ruled an accident.
-
The murder of his children.
-
The year he became eligible for parole (walk free again).
🔍 Step 1: Identifying the “Legendary” Liar
I started by searching for the most unique part of the story: a man pretending to be a doctor for nearly 20 years and working for the WHO.
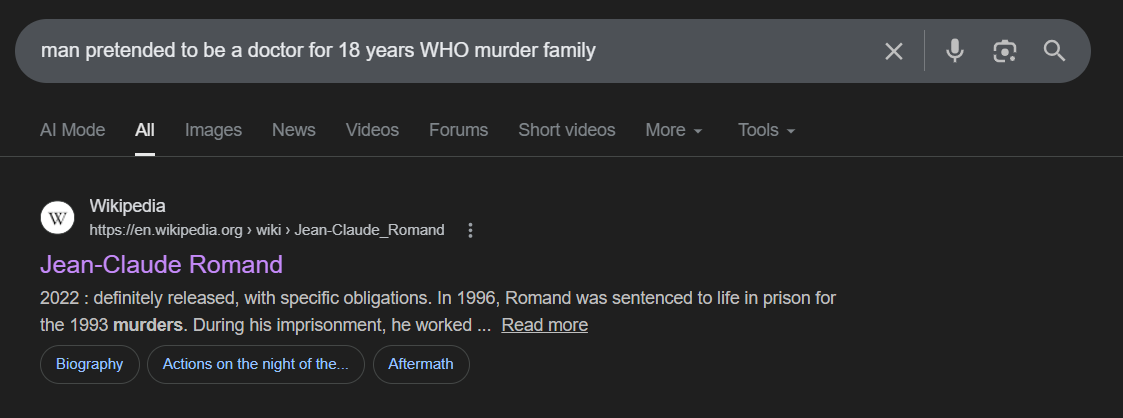
Search Query: man pretended to be a doctor for 18 years WHO murder family
The Discovery:
The search results immediately pointed to Jean-Claude Romand.
- Reference: Wikipedia - Jean-Claude Romand
From the Wikipedia entry, I confirmed the suspect is Jean-Claude Romand, who lied about his career for 18 years.
🧩 Step 2: Extracting the Fragments
Now that the case was confirmed, I used the same Wikipedia source to hunt for the 4 fragments.
Fragment 1: The Town near the Border
The description mentioned a town near the border where he lived and where the deception took place.
-
Investigation: Checking his biography on Wikipedia, it was clear where he was based.
-
Result: He lived in Ferney-Voltaire, a French town right on the border with Switzerland (near Geneva).
-
Format:
Ferney-Voltaire

Fragment 2: The “Accidental” Fall
The description mentioned a fall of a witness that was officially ruled an accident.
-
Investigation: I looked into the deaths associated with him before the main murders. I found the incident involving his father-in-law.
-
Evidence: “Jean-Claude Romand was the only witness to the death of his father-in-law, Pierre Crolet, on 23 October 1988.”
-
Format:
23-10-1988

Fragment 3: The Day the Children Died
I needed the exact date his children were killed during the final collapse of his illusion.
-
Investigation: According to the timeline of the murders, after killing his wife, he killed his children the next morning.
-
Evidence: Wikipedia confirms the murders of his children (Caroline and Antoine) occurred on 10 January 1993.
-
Format:
10-01-1993

Fragment 4: The Threshold of Freedom (Parole)
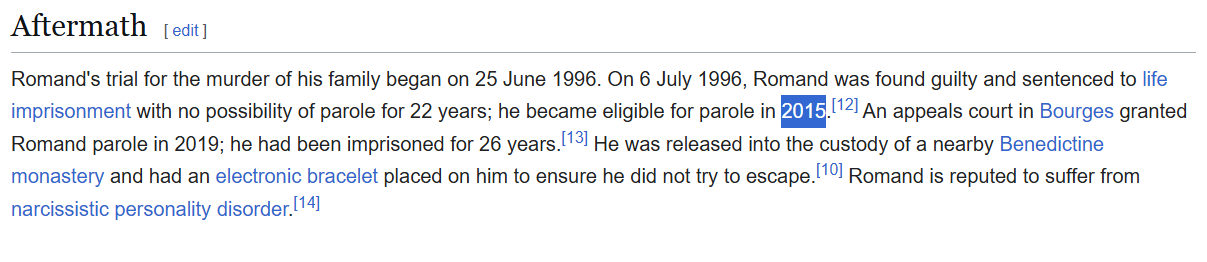
The final piece was the year he first became eligible to walk free (parole eligibility).
-
Investigation: I looked at his sentencing details.
-
Evidence: “On 6 July 1996, Romand was found guilty and sentenced to life imprisonment… he became eligible for parole in 2015.”
-
Format:
2015
🏁 Phase 3: Final Flag Construction
Piece them together as per the format: CATF{Xxxxxx-Xxxxxxxx_DD-MM-YYYY_DD-MM-YYYY_YYYY}
Final Flag: CATF{Ferney-Voltaire_23-10-1988_10-01-1993_2015}
=================================
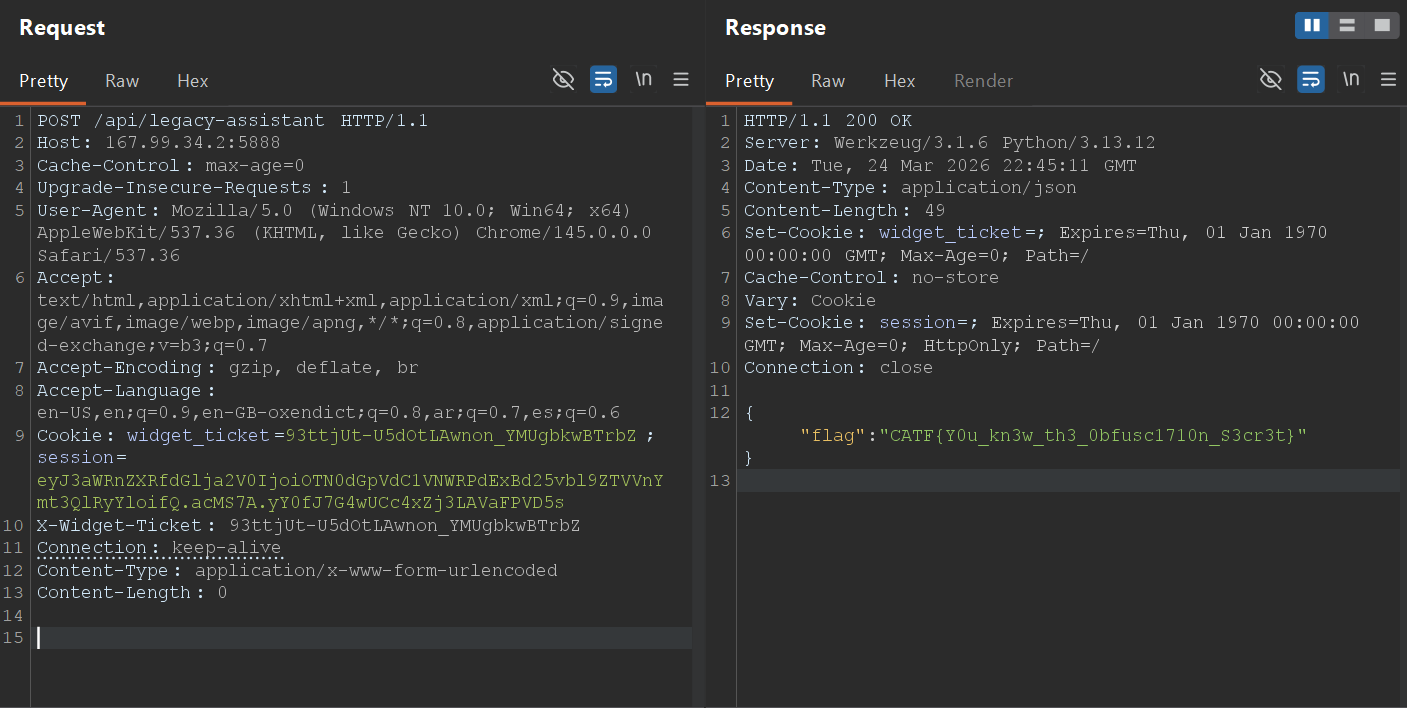
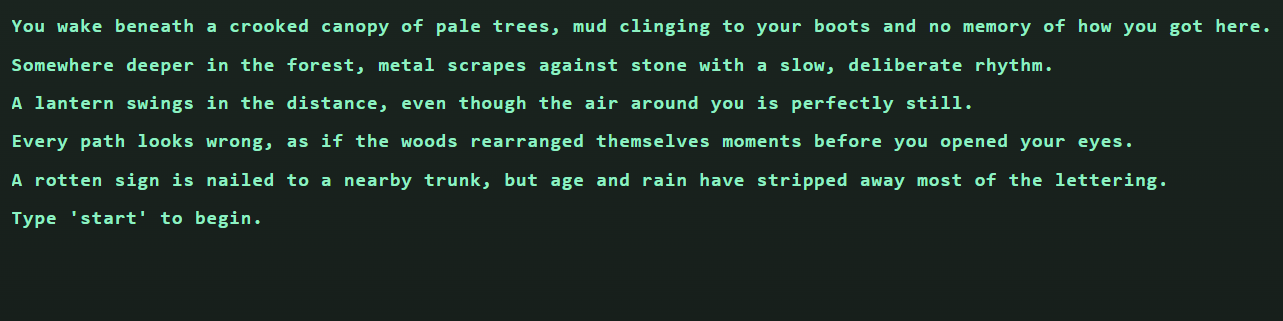
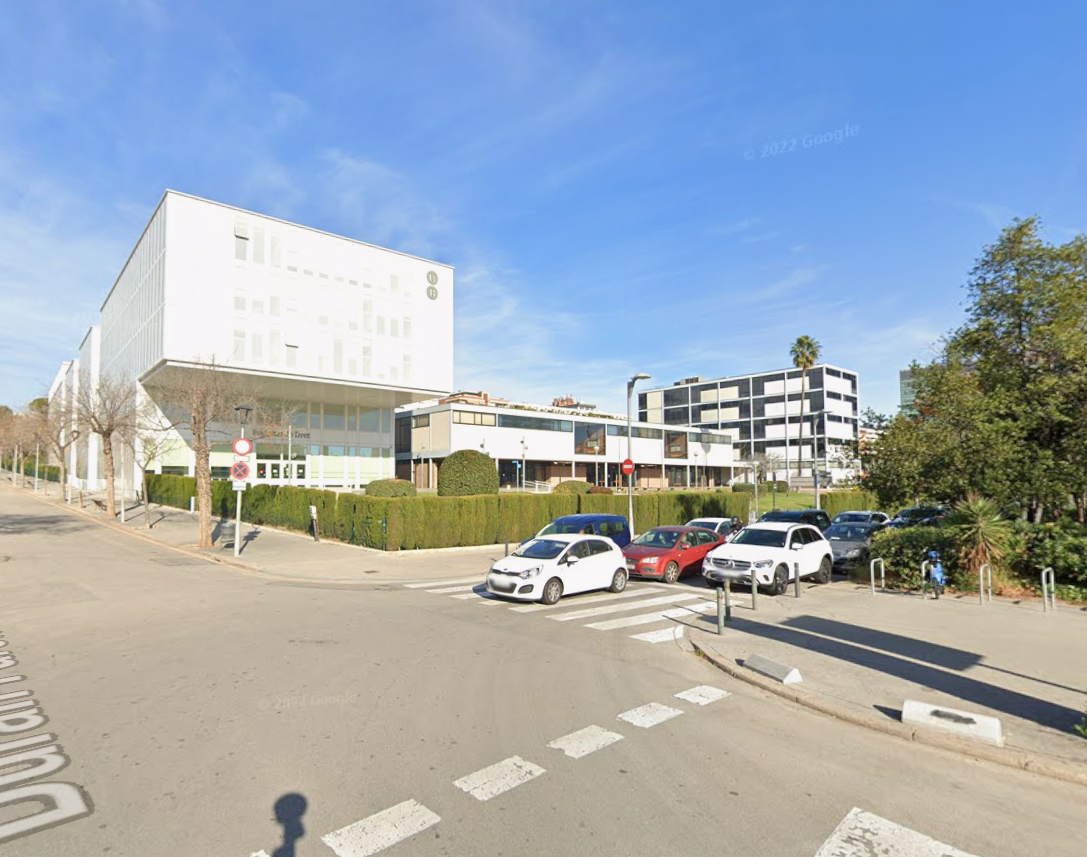
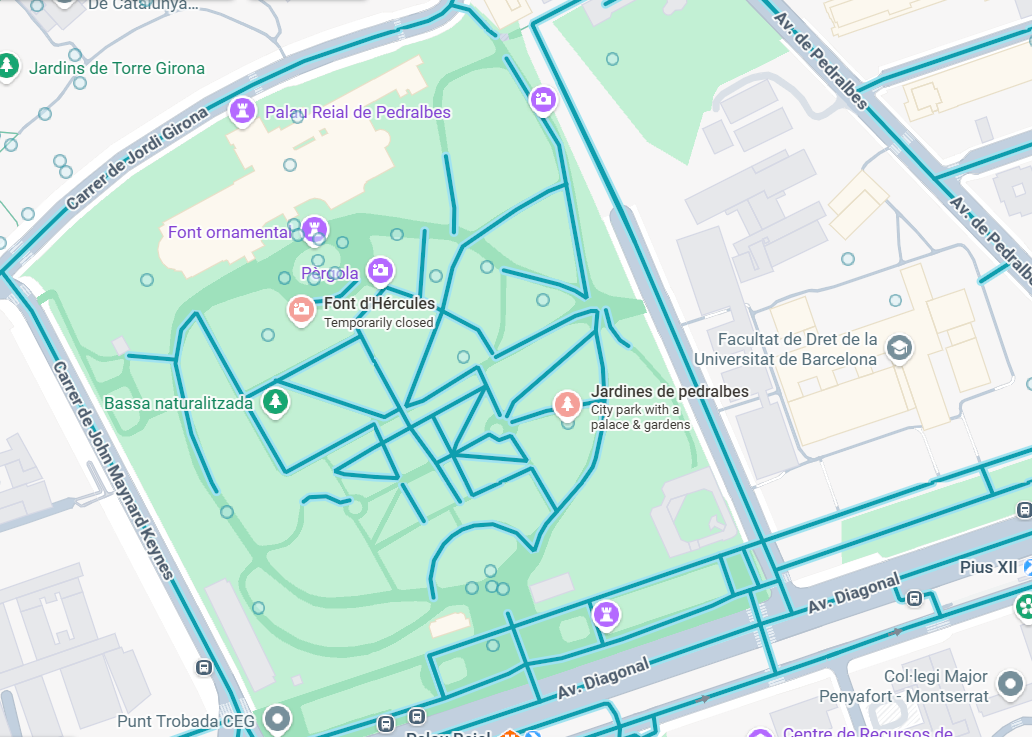
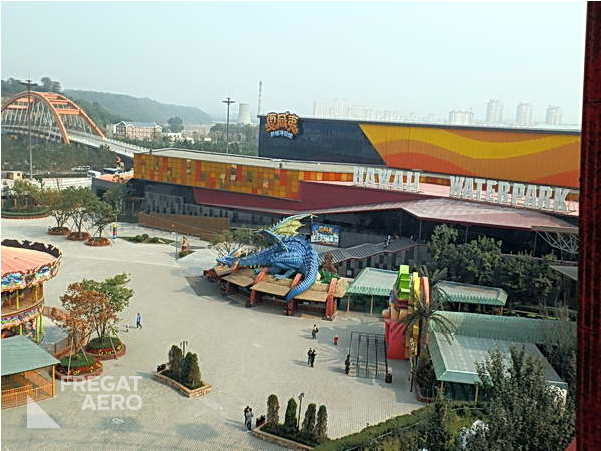
🕵️♂️ OSINT Series: P-P-PP-Park?
This was the fourth OSINT challenge I tackled in CAT CTF 26. This one was a pure test of Visual Forensics and patience. I was dropped into a massive water park with no context other than a cryptic plea for help.
To solve this, I had to travel halfway across the world digitally, deciphering signs and searching for the exact “sub-park” hidden within a giant amusement complex.
Author: ELJoOker
Points: 493

📝 The Challenge Description
“Idk where am I, or how did I get here. can you please take me home?”
Flag Format:
CATF{Location_name}

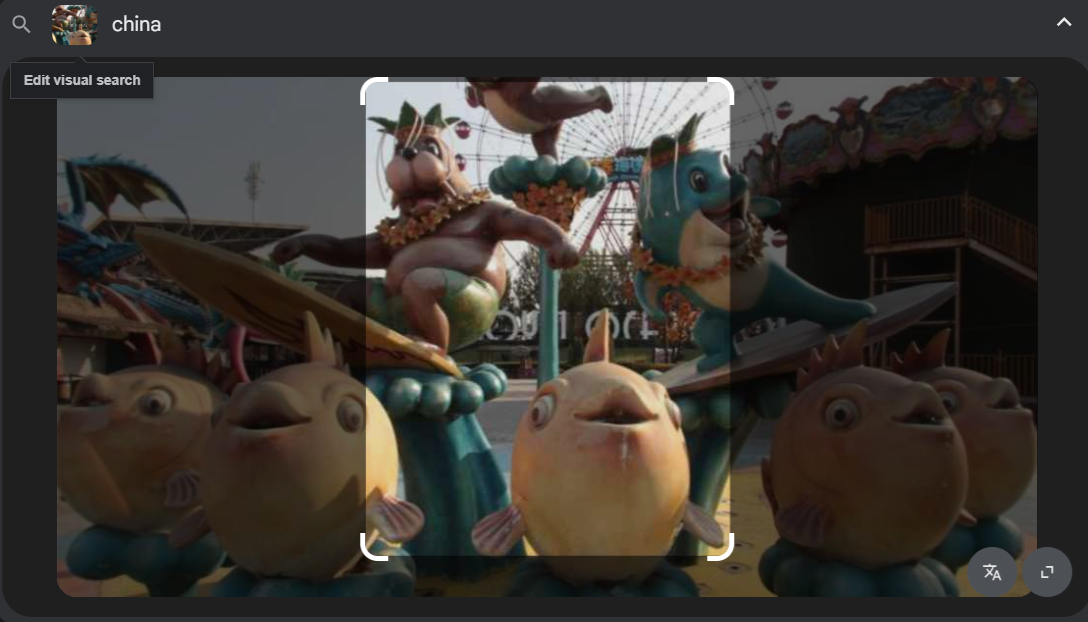
🔍 Step 1: Visual Cues & Initial Reconnaissance
The investigation started with a deep analysis of the provided photo. At first glance, it was just a typical, albeit massive, water park. However, looking closely at the background structures and distant signs, I noticed Chinese characters.
This was my first major lead: the location had to be in China.
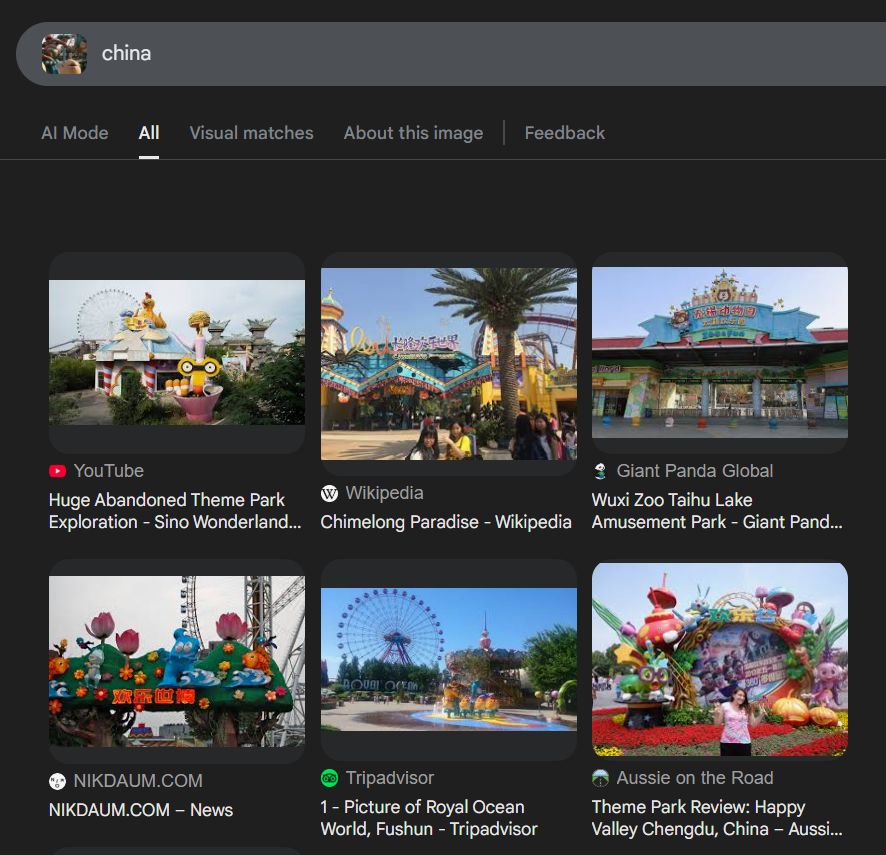
Search Strategy: I used a Reverse Image Search focusing on the most unique architecture in the park (the colorful slides and the castle-like buildings). I added the keyword China to refine the results.
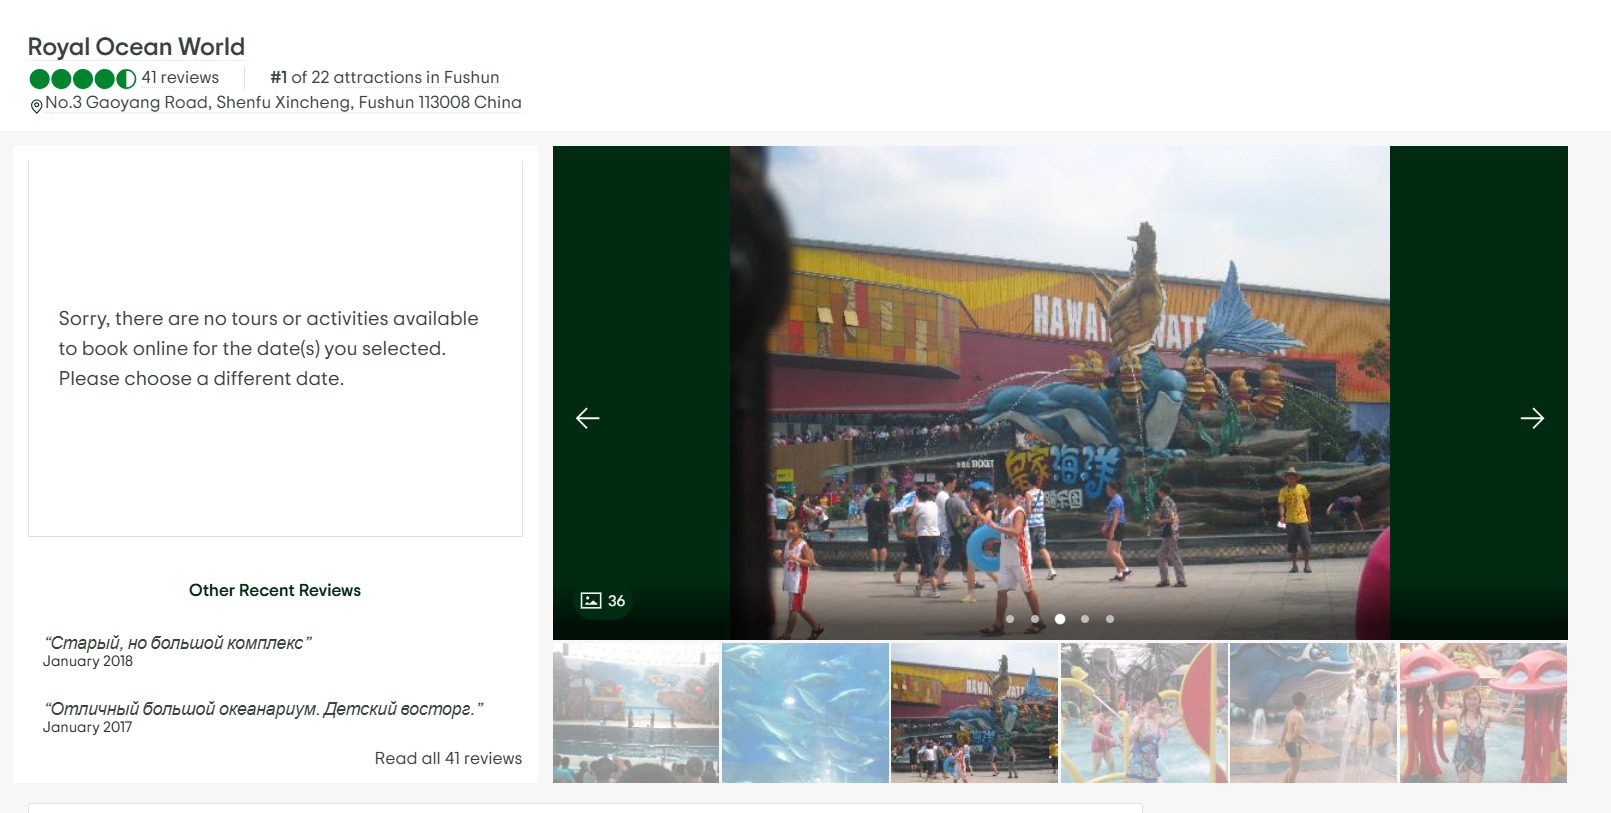
The Discovery: The search results quickly pointed to a destination called Royal Ocean World located in Shenyang, China.
Investigator’s Note: While I found the main park, the flag required the specific
Location_name, and Royal Ocean World is an umbrella name for several smaller theme parks.
🧩 Step 2: Finding the Specific “Fragment”
I needed to find the exact name of the water park section shown in the photo. I spent a long time searching for different angles of the park.

During my search, I found a low-quality photo where I could just barely make out the word “Hawaii” on a sign, but the rest of the text was obscured by the angle.
Refining the Search: I used a targeted query to confirm the divisions within Royal Ocean World: Search Query: royal ocean world "hawaii"
I hit gold with this travel guide:
- Reference: Triphobo - Things to do in Shenyang
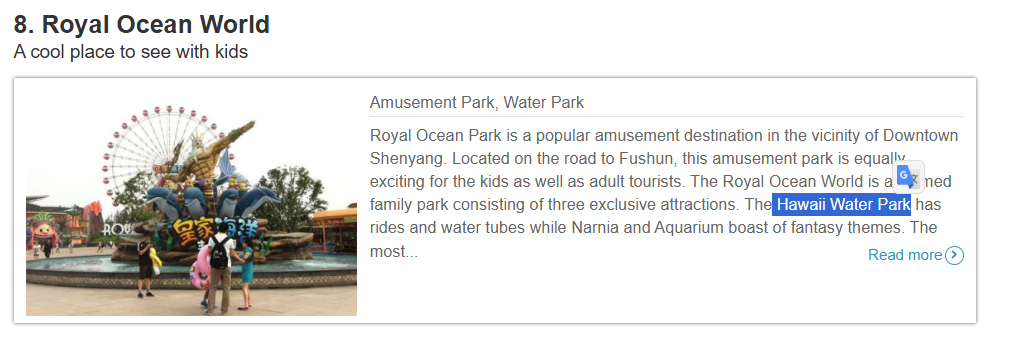
Evidence: The site listed the attractions: “The Royal Ocean World is a themed family park consisting of three exclusive attractions. The Hawaii Water Park has rides and water tubes while Narnia and Aquarium boast of fantasy themes.”
📸 Step 3: Final Confirmation
To ensure the flag was formatted correctly, I needed a clear shot of the entrance or the official name used on-site. I found an image archive from a travel site that showed the exact gate of the section.
- Reference: Royal Ocean World Image Archive

The photo clearly showed the branding for the Hawaii Water Park.
🏁 Phase 3: Final Flag Construction
The challenge asked for the Location_name in a specific format. Based on the evidence from the park’s internal divisions:
Final Flag: CATF{Hawaii_Water_Park}


